1. First make a batch of my Chocolate Truffles. Reserve 200 g and set aside to cool to room temperature. Preheat oven to 150 C or 300 F and place parchment on a 17 cm X 42 cm (11″ X 17″) baking sheet. Link to Chocolate Truffles written recipe: www.ketomealsandrecipes.com/recipe/chocolate-truffles/
2. Bloom the gelatin by sprinkling the gelatin powder into the cold water. Stir until the gelatin has dissolved. Set aside for at least 10 minutes
3. Separate the eggs. Place the yolks into a mixing bowl and the whites into a second mixing bowl or stand mixer bowl
4. Pour the room temperature Chocolate Truffles liquid into the egg yolks – whisk to combine well. Set aside
5. Whip the egg whites until all of the albumen has been whipped lightly (that is, there is no liquid left at the bottom. Add the lemon juice or the white vinegar and continue whipping to stiff peak stage
6. Scoop out about 1/3 of the whipped egg whites, transfer to chocolate egg yolk bowl and vigorously whisk together. Transfer a second 1/3 of the whipped egg whites to the chocolate yolk bowl and gently fold or combine, being careful not to deflate the whipped egg whites. Repeat with the last third of the egg whites
7. Pour the cake batter onto a parchment lined cookie sheet. Spread out to form a rectangle that is about ¾ inch or 2 cm thick. Use a spatula to level the surface. ALTERNATIVELY prepare a 9 inch or 22 cm round cake pan
8. Place in the medium rack position in the oven. Bake for 20 minutes, rotating the pan at 10 minutes to ensure even baking. After 20 minutes, test by gently pressing the center of the sponge cake. It should bounce back without being too soft. If needed, bake for 2-5 minutes. Do not overbake. If over-baked, the cake will be dry and will not be springy
9. Let cool in the pan. Place a fresh sheet of parchment on top of the cake. Place rack over the parchment and flip. Peel off the parchment that was under the cake
10. Re melt the gelatin. Set aside to cool to room temperature
11. Place the cream cheese and ricotta into the mixing bowl and whip at high speed to soften and remove all the lumps. Add the lemon juice and whip to combine. Add the vanilla, whip to combine. As you continue whipping, slowly pour the melted gelatin into the cheesecake mixture. Whip until the combination of ingredients is smooth, lump free and velvety. Set aside on the counter
Assemble the Black Forest cake
12. To assemble the cake, choose either a square or round spring form pan. Cut out 2 exact sized and shaped pieces of cake from the sheet of cake. Place a fitted parchment sheet into the springform pan of your choice. Also line the side of the pan with parchment
13. Lay one of the cake layers on the bottom of the pan. Pour half of your no bake cheesecake mixture on top of the cake
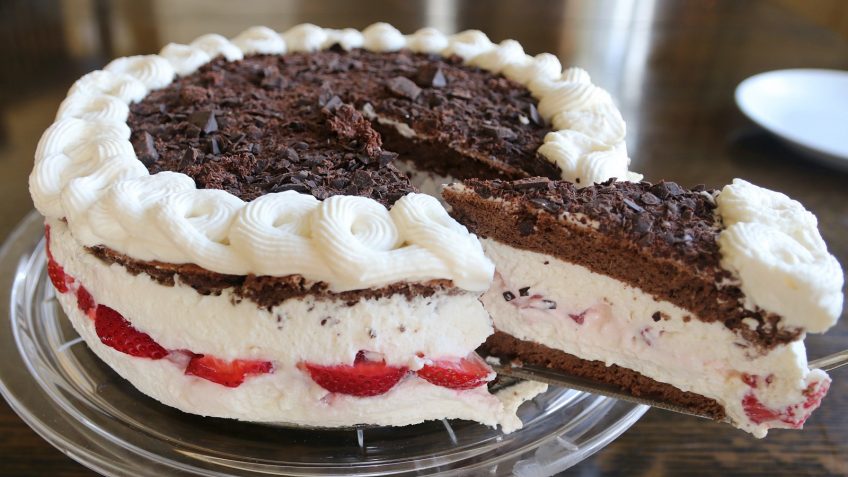
14. Distribute the strawberry pieces on top of the cheesecake layer (or sub with fresh cut black cherries). Arrange some of the strawberry or cherry pieces so they will be visible from the outer edge of the cake. Pour the rest of the cheesecake on top of the strawberries. Cover with cling wrap and refrigerate overnight
15. Place the second piece of cake on top of the cheesecake, nice side up. Spread a thin layer of whipped cream on the surface. Sprinkle the chocolate shavings over the surface to about ½ inch or 1.5 cm from the edge of the cake surface
16. Remove the cake from the spring form pan. Pipe whipped cream on the outer edge of the cake. Refrigerate for about 30 minutes before serving. Cut, serve and enjoy!


Although this cake is best served within the first two days, the extra pieces of cake can be stored covered in the fridge for several days. We have had the cake remain tasty for up to 5 days.
All rights reserved © Angela Wilkes 2017-2025 Privacy Policy

1. First make a batch of my Chocolate Truffles. Reserve 200 g and set aside to cool to room temperature. Preheat oven to 150 C or 300 F and place parchment on a 17 cm X 42 cm (11″ X 17″) baking sheet. Link to Chocolate Truffles written recipe: www.ketomealsandrecipes.com/recipe/chocolate-truffles/
2. Bloom the gelatin by sprinkling the gelatin powder into the cold water. Stir until the gelatin has dissolved. Set aside for at least 10 minutes
3. Separate the eggs. Place the yolks into a mixing bowl and the whites into a second mixing bowl or stand mixer bowl
4. Pour the room temperature Chocolate Truffles liquid into the egg yolks – whisk to combine well. Set aside
5. Whip the egg whites until all of the albumen has been whipped lightly (that is, there is no liquid left at the bottom. Add the lemon juice or the white vinegar and continue whipping to stiff peak stage
6. Scoop out about 1/3 of the whipped egg whites, transfer to chocolate egg yolk bowl and vigorously whisk together. Transfer a second 1/3 of the whipped egg whites to the chocolate yolk bowl and gently fold or combine, being careful not to deflate the whipped egg whites. Repeat with the last third of the egg whites
7. Pour the cake batter onto a parchment lined cookie sheet. Spread out to form a rectangle that is about ¾ inch or 2 cm thick. Use a spatula to level the surface. ALTERNATIVELY prepare a 9 inch or 22 cm round cake pan
8. Place in the medium rack position in the oven. Bake for 20 minutes, rotating the pan at 10 minutes to ensure even baking. After 20 minutes, test by gently pressing the center of the sponge cake. It should bounce back without being too soft. If needed, bake for 2-5 minutes. Do not overbake. If over-baked, the cake will be dry and will not be springy
9. Let cool in the pan. Place a fresh sheet of parchment on top of the cake. Place rack over the parchment and flip. Peel off the parchment that was under the cake
10. Re melt the gelatin. Set aside to cool to room temperature
11. Place the cream cheese and ricotta into the mixing bowl and whip at high speed to soften and remove all the lumps. Add the lemon juice and whip to combine. Add the vanilla, whip to combine. As you continue whipping, slowly pour the melted gelatin into the cheesecake mixture. Whip until the combination of ingredients is smooth, lump free and velvety. Set aside on the counter
Assemble the Black Forest cake
12. To assemble the cake, choose either a square or round spring form pan. Cut out 2 exact sized and shaped pieces of cake from the sheet of cake. Place a fitted parchment sheet into the springform pan of your choice. Also line the side of the pan with parchment
13. Lay one of the cake layers on the bottom of the pan. Pour half of your no bake cheesecake mixture on top of the cake
14. Distribute the strawberry pieces on top of the cheesecake layer (or sub with fresh cut black cherries). Arrange some of the strawberry or cherry pieces so they will be visible from the outer edge of the cake. Pour the rest of the cheesecake on top of the strawberries. Cover with cling wrap and refrigerate overnight
15. Place the second piece of cake on top of the cheesecake, nice side up. Spread a thin layer of whipped cream on the surface. Sprinkle the chocolate shavings over the surface to about ½ inch or 1.5 cm from the edge of the cake surface
16. Remove the cake from the spring form pan. Pipe whipped cream on the outer edge of the cake. Refrigerate for about 30 minutes before serving. Cut, serve and enjoy!


Although this cake is best served within the first two days, the extra pieces of cake can be stored covered in the fridge for several days. We have had the cake remain tasty for up to 5 days.
You must be logged in to post a comment